studio460
Well-known member
Bosch EL-51253 30A EVSE: [Note: The original post has been edited for improved accuracy.]
Based mainly on price and appearance, I purchased a Bosch EL-51253 Power Max 30A Level 2 charging station with an 18' SAE J1772 connector/cable from Amazon ($569.55, with free two-day Amazon Prime shipping).
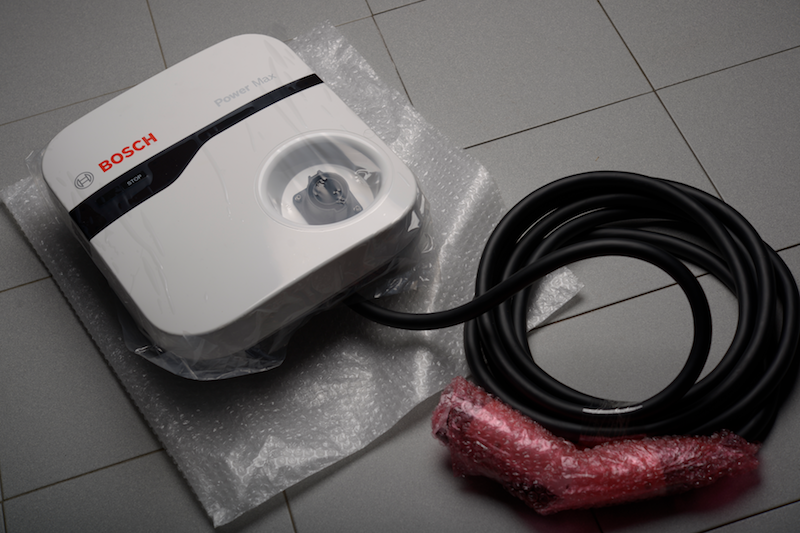
It's a good-looking unit, though not as pretty as the Schneider EVlink (which is only rated for indoor use). My installation is outdoors, so I chose the Bosch instead, since it's rated for both indoor and outdoor use. As other Amazon customers have noted, it's actually bigger than it appears in photos. The white plastic housing is nearly pure-white, and has a clean, modern look. I'm mounting this outdoors on the front porch (though it's still in a covered area), where it will only be a few feet from the car's charging port.
New 240V service:
When I upgraded our service panel for a kitchen re-model a few years ago, I had a 200A, 40/40 Cutler-Hammer panel installed by a professional electrician. This is a large panel with plenty of extra space for the new service (if you have an older, smaller panel, with a lower total amperage rating, you may need to upgrade your panel first). The job will entail running about 65' of metal conduit from the panel, under the eaves, through the garage, and finally to the front porch, onto an exterior wall, where I've already installed the mounting plate.
Circuit-breaker: 40A/dual-pole.
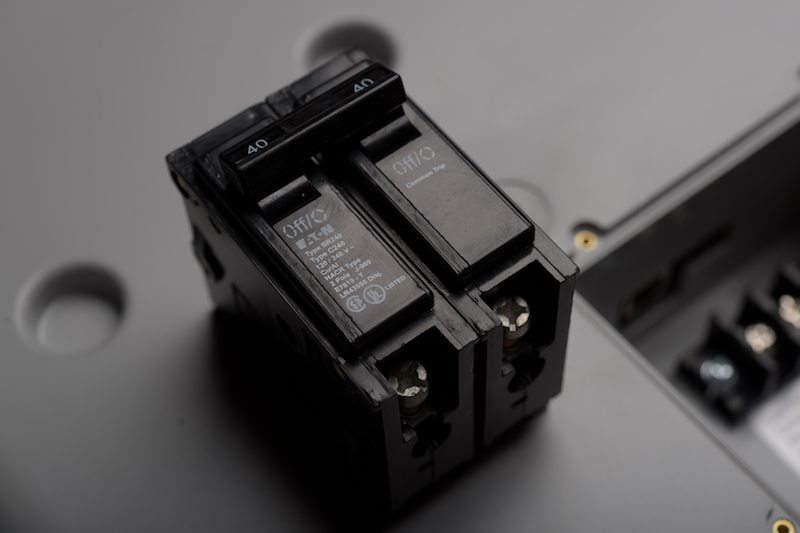
Apparently, a 40A breaker is what you need to accommodate a continuous, 30A-draw (to comply with the necessary 20% minimum safety margin). So, I bought a 40A/dual-pole, Cutler-Hammer breaker from Home Depot for about $10 (according to code, you're supposed to install breakers from the same manufacturer as the service panel).
Wiring: #8 AWG
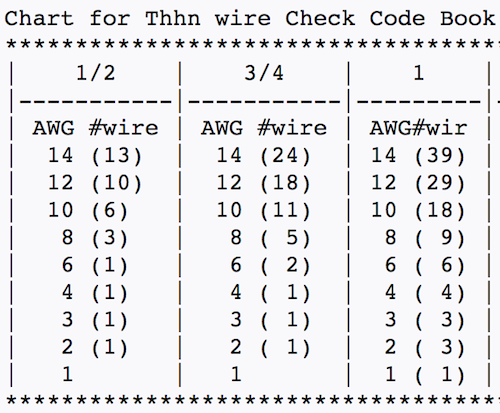
I finally was able to determine the proper wire gauge to use for a 240V/30A Level 2 charger (it's not in the manual). The correct gauge is #8 AWG, copper, stranded (for easier installation), for a continuous 30A current-draw (even though our cars don't draw that much). This is for runs under 100'. For runs over 100', #6 AWG is recommended (to avoid voltage-drop) by the industry site I referenced.
Wiring diagram:
So, not a lot of information in the Bosch manual (e.g., all it says is to, "connect each [wire] to the correct terminal."). Small relief markings above the post terminals indicate a ground symbol, and the letters, 'N' and 'L'. Assuming that 'N' stands for "neutral," this is incorrect, since the neutral isn't used in a 240V hook-up. This is likely meant for the 120V version of the Bosch EVSE (which does use a neutral), and Bosch just used the same mold for the 240V version of the product.
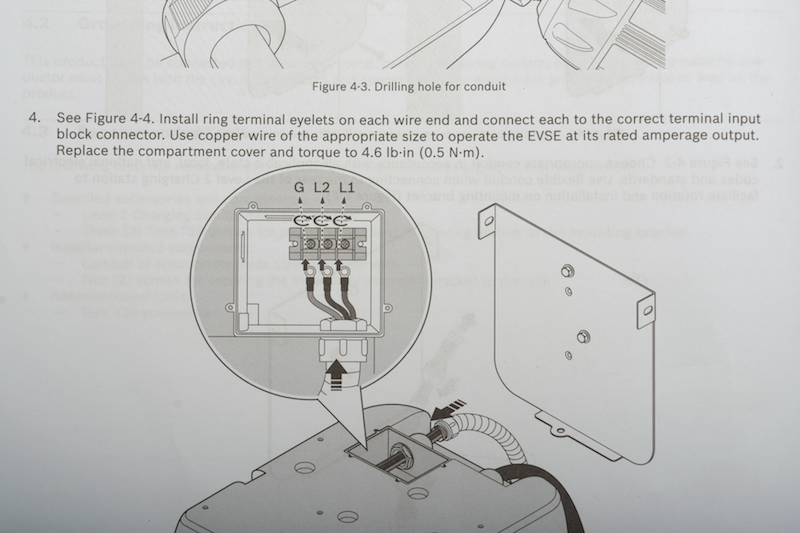
However, the wiring diagram in the Bosch manual correctly labels these same terminals as 'G', 'L2' and 'L1'. This made immediate sense to my electrician, where 'L1' and 'L2' indicate "line 1" and "line 2," meaning the two "hots" (again, the neutral isn't used in single-phase 240V installations, only a ground and two "hot" lines).
Here's a close-up of the post terminals:
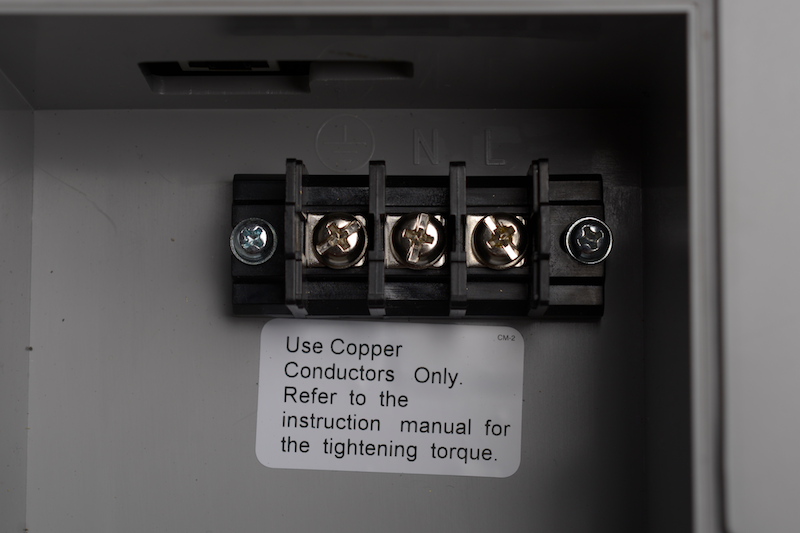
Note that the sticker says to use copper conductors only. The manual also indicates the proper terminal-post, screw-tightening torque specification (4.6 lb.-in.). Here's the Bosch instruction page on terminal wiring connections (note that the manual is printed in black-and-white):
Post terminals:
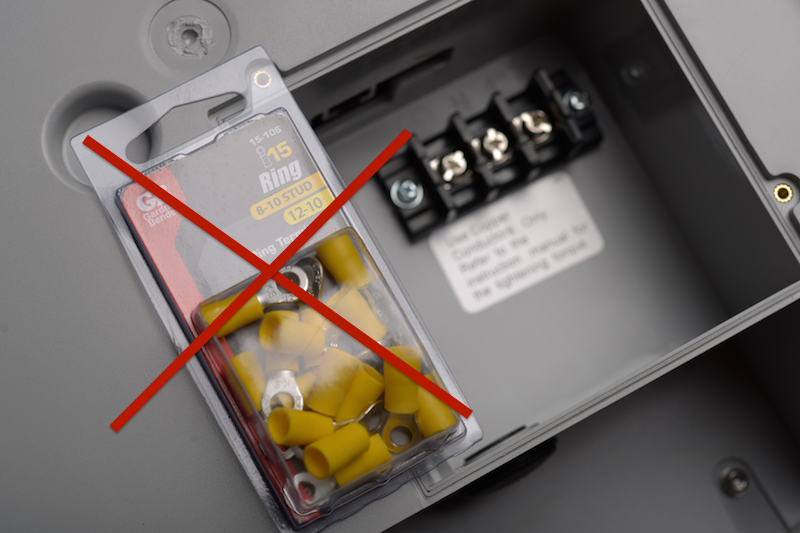
The Bosch instructions say to attach the wiring to the terminal posts using terminal rings. Initially, I bought the wrong terminal rings (designed for #12-#10 AWG), which are too small for #8 AWG wire. Note that most terminal rings carried by home improvement stores are designed for smaller-gauge wiring, and those that aren't have a ring size too large to fit onto the Bosch post terminals. So, instead, what you want are "mechanical lugs," made out of copper (with stainless steel screws). Note: DO NOT use aluminum terminal rings; see post later in thread for recommended copper lugs, available from Home Depot: (e.g., Burndy KA8CBAG2R or equivalent).
Conduit size:
As for the conduit size, I found this online at some electrical industry site:
Knock-out:
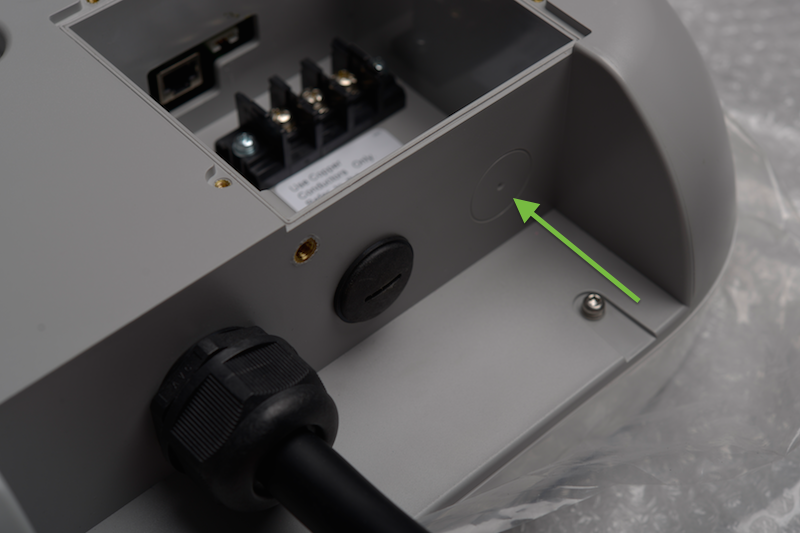
One last thing . . . Bosch wants you to drill a hole in the bottom for the conduit access (indicated by the green arrow). They say, "be careful," so that you don't damage the plastic housing (it would've killed them to provide a knock-out?). Also, since I have to drill a hole for the conduit, why is there a molded plastic fitting right next to it? What's that for? All drawings in the instructions show the user-drilled hole next to the molded fitting, with no mention what the fitting is for:
Security:
Sorry, one more thing . . . Bosch recommends using a flexible conduit for the last few feet to make mounting easier. I've asked my electrician to just run the metal conduit right up into the box for an added layer of security against theft. Also, the provided screws which attach the unit to its mounting plate are Torx #30 screws. I may also fasten metal 'L' plates to the house siding to prevent access to the Torx screws (any would-be thief would first have to unscrew the metal plates).
I welcome any further comments, corrections, or suggestions!
Based mainly on price and appearance, I purchased a Bosch EL-51253 Power Max 30A Level 2 charging station with an 18' SAE J1772 connector/cable from Amazon ($569.55, with free two-day Amazon Prime shipping).

It's a good-looking unit, though not as pretty as the Schneider EVlink (which is only rated for indoor use). My installation is outdoors, so I chose the Bosch instead, since it's rated for both indoor and outdoor use. As other Amazon customers have noted, it's actually bigger than it appears in photos. The white plastic housing is nearly pure-white, and has a clean, modern look. I'm mounting this outdoors on the front porch (though it's still in a covered area), where it will only be a few feet from the car's charging port.
New 240V service:
When I upgraded our service panel for a kitchen re-model a few years ago, I had a 200A, 40/40 Cutler-Hammer panel installed by a professional electrician. This is a large panel with plenty of extra space for the new service (if you have an older, smaller panel, with a lower total amperage rating, you may need to upgrade your panel first). The job will entail running about 65' of metal conduit from the panel, under the eaves, through the garage, and finally to the front porch, onto an exterior wall, where I've already installed the mounting plate.
Circuit-breaker: 40A/dual-pole.
Apparently, a 40A breaker is what you need to accommodate a continuous, 30A-draw (to comply with the necessary 20% minimum safety margin). So, I bought a 40A/dual-pole, Cutler-Hammer breaker from Home Depot for about $10 (according to code, you're supposed to install breakers from the same manufacturer as the service panel).

Wiring: #8 AWG
I finally was able to determine the proper wire gauge to use for a 240V/30A Level 2 charger (it's not in the manual). The correct gauge is #8 AWG, copper, stranded (for easier installation), for a continuous 30A current-draw (even though our cars don't draw that much). This is for runs under 100'. For runs over 100', #6 AWG is recommended (to avoid voltage-drop) by the industry site I referenced.
Wiring diagram:
So, not a lot of information in the Bosch manual (e.g., all it says is to, "connect each [wire] to the correct terminal."). Small relief markings above the post terminals indicate a ground symbol, and the letters, 'N' and 'L'. Assuming that 'N' stands for "neutral," this is incorrect, since the neutral isn't used in a 240V hook-up. This is likely meant for the 120V version of the Bosch EVSE (which does use a neutral), and Bosch just used the same mold for the 240V version of the product.
However, the wiring diagram in the Bosch manual correctly labels these same terminals as 'G', 'L2' and 'L1'. This made immediate sense to my electrician, where 'L1' and 'L2' indicate "line 1" and "line 2," meaning the two "hots" (again, the neutral isn't used in single-phase 240V installations, only a ground and two "hot" lines).
Here's a close-up of the post terminals:

Note that the sticker says to use copper conductors only. The manual also indicates the proper terminal-post, screw-tightening torque specification (4.6 lb.-in.). Here's the Bosch instruction page on terminal wiring connections (note that the manual is printed in black-and-white):

Post terminals:
The Bosch instructions say to attach the wiring to the terminal posts using terminal rings. Initially, I bought the wrong terminal rings (designed for #12-#10 AWG), which are too small for #8 AWG wire. Note that most terminal rings carried by home improvement stores are designed for smaller-gauge wiring, and those that aren't have a ring size too large to fit onto the Bosch post terminals. So, instead, what you want are "mechanical lugs," made out of copper (with stainless steel screws). Note: DO NOT use aluminum terminal rings; see post later in thread for recommended copper lugs, available from Home Depot: (e.g., Burndy KA8CBAG2R or equivalent).

Conduit size:
As for the conduit size, I found this online at some electrical industry site:

Knock-out:
One last thing . . . Bosch wants you to drill a hole in the bottom for the conduit access (indicated by the green arrow). They say, "be careful," so that you don't damage the plastic housing (it would've killed them to provide a knock-out?). Also, since I have to drill a hole for the conduit, why is there a molded plastic fitting right next to it? What's that for? All drawings in the instructions show the user-drilled hole next to the molded fitting, with no mention what the fitting is for:

Security:
Sorry, one more thing . . . Bosch recommends using a flexible conduit for the last few feet to make mounting easier. I've asked my electrician to just run the metal conduit right up into the box for an added layer of security against theft. Also, the provided screws which attach the unit to its mounting plate are Torx #30 screws. I may also fasten metal 'L' plates to the house siding to prevent access to the Torx screws (any would-be thief would first have to unscrew the metal plates).
I welcome any further comments, corrections, or suggestions!


