triangles
Well-known member
You can wire your dash cam's power from behind the overhead console. First the usual disclaimers: The following information is for entertainment purposes only. Use at your own risk. Your mileage may vary. etc etc. Now on to how to remove the overhead console. I'm Blatantly stealing some from SteveP. I hope he doesn't mind. The '14 and earlier have a different overhead console than the '17s. I don't know what the '15, '16 have for overhead consoles. When someone who has one of these chimes in I'll update this guide. Simply skip the parts that don't apply to your model year.
The panel behind the sunglasses area opens separately and you can gain access to lots of power there - including the power that I wanted.
To open this panel, open the sunglasses door. You'll fund two areas where you can get a small screwdriver into. You push toward the rear of the car on a tab and pull the panel down. One on the left and one on the right. After releasing these tabs, the rest of the panel will pull out:

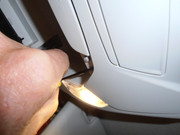
Work gently - you will feel the tab and it's give. You should not need much force but it may take a few tries to find the right spot. Be patient.
Here's a close up of one of the tabs that you have to release:
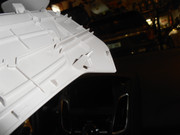
The microphone snaps out of this piece so you can get it out of the way. If you still can't figure it out search youtube. There are videos there that show how to remove this.
The '14 and earlier have the LED mood lighting controller with an 16pin plug. The '17s as in SteveP's pictures apparently do not have the LED mood lighting but they have the nifty Map lights (at least the '14 and earlier do not have) as shown in the pictures above. After performing the steps above you unplug the 16 pin plug and pop out the microphone to get this piece out of the way.
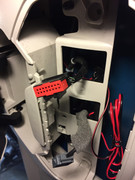
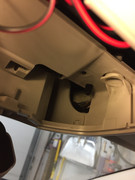
To make it easier to route the wires to the windshield and for an easy grounding point you have to remove the rest of the overhead console. These two pictures show the clips you can pry with a screw driver to get the rest of it off. There are 4 clips, 2 toward the front and 2 toward the back.
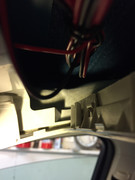
'14 and earlier +12V source:
For the '14 and earlier for +12V you simply tap into the Brown/Green wire that goes into pin 8 of the 16 pin plug You can verify with a multimeter that you have the right wire. The other Brown/Green wires will not have any power. Note that this power will stay on up to 30 min after you turn off the car. Mine consistently shuts off after 13 minutes. Anything that "wakes up" the car such as opening a door, using the key fob, remote start, Go times, etc will restart this timer. It's a little annoying but does have some potential benefits like using the key fob to start the camera before you get to your car and potentially catching any vandals who damage your car shortly after you leave it. view this image full size to see the pin numbers and help you determine which one is pin 8.
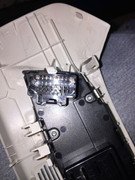
This is how my plug looked after I tapped into the Brown/green pin 8 wire. You can see the red wire coming out of the bundle and going to the fuse holder of the 5V USB power supply.
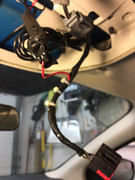
'17 model year +12V source:
To get the +12V if you have the map light overhead console things are a little different. Before anyone hacks into their wiring, someone with a '17 please verify the +12V turns off after a time out like the +12V source does on the '14 and earlier models. Since I don't have a '17 I can't verify this. On the driver's side you'll see a connector between the console and the roof. It's gray. Pull out the connector and move it to where you can access the wires. Here it is out:
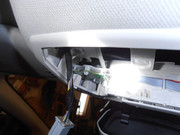
You want to tap into the Yellow/violet wire going to pin 1 for +12V The Black/white wire going to pin 6 is ground but I prefer to use a screw for a ground. Below is a picture of an overhead console removed with a cut off wire harness plugged in.
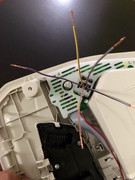
Now that you've got your +12V you can simply stuff the 5v USB power supply up above the overhead console. I found a nice place to double stick tape mine. Where it's at you can't really take a picture but when you take yours apart you'll see there is plenty of space up there for it. This next picture is why we took down the rest of the overhead console. You can see there are two screws for easy grounding points and you have wide open access to feed the 5V USB wire to your dash cam. The screw is a torx screw. I don't remember which size but I think it's a 20 or 25.
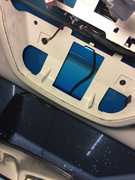
At this point find a convenient place to stick the power supply and tidy up your excess wires. Then you simply reinstall the overhead console and enjoy your dash cam.
As a side note I'm upgrading my '14 to also have the map light overhead console. I've figured out If I supply +12V to pin 1 and ground pin 6 The map lights work as expected press to turn on/off. I would like the map lights to come on with the dome lights when you open the door. I have yet to figure out how to do this. I do not know what the wires to pins 3, 4, and 5 do. Since SteveP's thread here on lighted sills indicate he is using pin 4 (violet) as a power source for the lighted sills I'm guessing pins 3 and 5 are data wires. I tried applying 12V to pin 4 but the map lights didn't light. So maybe there's logic on the map light boards that uses data from pin 3,5 wires and the logic turns on an output to pin 4? Looks like I'll be studying some wiring diagrams. If anyone can offer wiring diagrams for the map lights or know what pins 3,4,5 do I would greatly appreciate it.
The panel behind the sunglasses area opens separately and you can gain access to lots of power there - including the power that I wanted.
To open this panel, open the sunglasses door. You'll fund two areas where you can get a small screwdriver into. You push toward the rear of the car on a tab and pull the panel down. One on the left and one on the right. After releasing these tabs, the rest of the panel will pull out:


Work gently - you will feel the tab and it's give. You should not need much force but it may take a few tries to find the right spot. Be patient.
Here's a close up of one of the tabs that you have to release:

The microphone snaps out of this piece so you can get it out of the way. If you still can't figure it out search youtube. There are videos there that show how to remove this.
The '14 and earlier have the LED mood lighting controller with an 16pin plug. The '17s as in SteveP's pictures apparently do not have the LED mood lighting but they have the nifty Map lights (at least the '14 and earlier do not have) as shown in the pictures above. After performing the steps above you unplug the 16 pin plug and pop out the microphone to get this piece out of the way.

To make it easier to route the wires to the windshield and for an easy grounding point you have to remove the rest of the overhead console. These two pictures show the clips you can pry with a screw driver to get the rest of it off. There are 4 clips, 2 toward the front and 2 toward the back.


'14 and earlier +12V source:
For the '14 and earlier for +12V you simply tap into the Brown/Green wire that goes into pin 8 of the 16 pin plug You can verify with a multimeter that you have the right wire. The other Brown/Green wires will not have any power. Note that this power will stay on up to 30 min after you turn off the car. Mine consistently shuts off after 13 minutes. Anything that "wakes up" the car such as opening a door, using the key fob, remote start, Go times, etc will restart this timer. It's a little annoying but does have some potential benefits like using the key fob to start the camera before you get to your car and potentially catching any vandals who damage your car shortly after you leave it. view this image full size to see the pin numbers and help you determine which one is pin 8.

This is how my plug looked after I tapped into the Brown/green pin 8 wire. You can see the red wire coming out of the bundle and going to the fuse holder of the 5V USB power supply.

'17 model year +12V source:
To get the +12V if you have the map light overhead console things are a little different. Before anyone hacks into their wiring, someone with a '17 please verify the +12V turns off after a time out like the +12V source does on the '14 and earlier models. Since I don't have a '17 I can't verify this. On the driver's side you'll see a connector between the console and the roof. It's gray. Pull out the connector and move it to where you can access the wires. Here it is out:

You want to tap into the Yellow/violet wire going to pin 1 for +12V The Black/white wire going to pin 6 is ground but I prefer to use a screw for a ground. Below is a picture of an overhead console removed with a cut off wire harness plugged in.

Now that you've got your +12V you can simply stuff the 5v USB power supply up above the overhead console. I found a nice place to double stick tape mine. Where it's at you can't really take a picture but when you take yours apart you'll see there is plenty of space up there for it. This next picture is why we took down the rest of the overhead console. You can see there are two screws for easy grounding points and you have wide open access to feed the 5V USB wire to your dash cam. The screw is a torx screw. I don't remember which size but I think it's a 20 or 25.

At this point find a convenient place to stick the power supply and tidy up your excess wires. Then you simply reinstall the overhead console and enjoy your dash cam.
As a side note I'm upgrading my '14 to also have the map light overhead console. I've figured out If I supply +12V to pin 1 and ground pin 6 The map lights work as expected press to turn on/off. I would like the map lights to come on with the dome lights when you open the door. I have yet to figure out how to do this. I do not know what the wires to pins 3, 4, and 5 do. Since SteveP's thread here on lighted sills indicate he is using pin 4 (violet) as a power source for the lighted sills I'm guessing pins 3 and 5 are data wires. I tried applying 12V to pin 4 but the map lights didn't light. So maybe there's logic on the map light boards that uses data from pin 3,5 wires and the logic turns on an output to pin 4? Looks like I'll be studying some wiring diagrams. If anyone can offer wiring diagrams for the map lights or know what pins 3,4,5 do I would greatly appreciate it.


